
If you’re someone who refuses to leave the house without on fleek eyebrows, then you’re preaching to the choir sister! What that also means is I spend a ridiculous amount of time every morning just to shape and fill my brows right. Lately, I realized that waking up an hour early to have extra time to do my eyebrows is no longer working for me. So, I checked out my options and gravitated toward microblading. The only thing I’m wondering now is, why didn’t I get it done sooner?
Microblading is semi-permanent eyebrow tattooing that results in full, natural-looking brows. Many people love this technique for its feather-like strokes that simulate real brow hair. It’s a bespoke process, making sure the eyebrow is shaped according to a client’s face shape. Additionally, the pigment is also mixed based on the client’s hair color for a natural, realistic look.
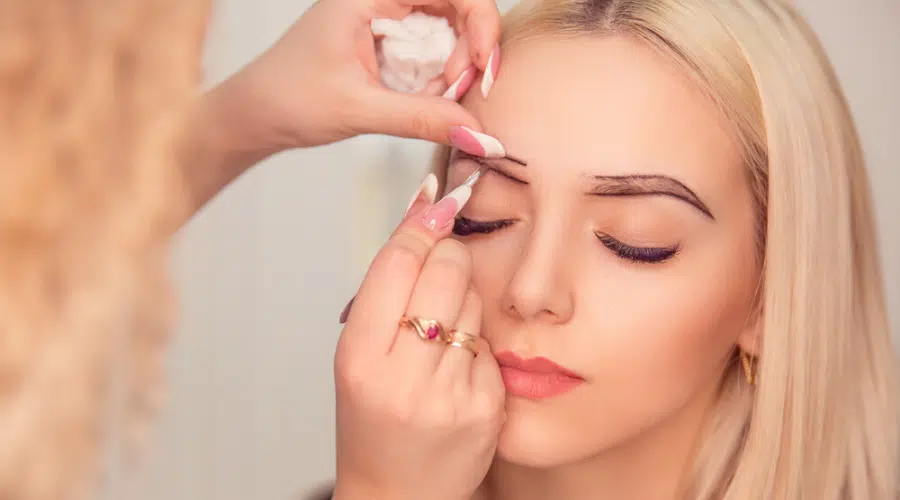
What is Microblading?
Microblading is a precise process of filling in eyebrows. It uses semi-permanent pigments implanted on the skin. It uses a tool that acts as a pen but the tip has 10-12 tiny needles. These needles penetrate the surface of the skin to implant the medical-grade pigment. The thin needles also help create the featherweight strokes, resembling real eyebrow hair.
One of the things I didn’t like with the old school eyebrow tattooing is how unnatural it looks, especially when the ink starts to fade (it starts to have a greenish hue!). It also looks like stamped ink on the brows more than anything. This is why I had to look for other options. I had to reduce the time I spend working on my eyebrows every day. And I want to make sure my brows are always ready to go with little to no effort!
Before I consulted with a professional eyebrow artist, I did my homework. I read articles and even watched YouTube videos on what the process is like. I don’t like needles! But I had to check if this process was something doable for me and if it was worth it.
After deciding to give microblading a try, I went to the eyebrow artist’s clinic. I spoke to her about what I want my brows to look like. My sparse brows have always been a problem for me. It takes me a while to fill in my brows and make it look natural. I explained my concerns to her. She thought microblading was the right choice for me (I’ll talk about the other options later).
I also researched reputable technicians in our area to make sure I won’t get a botched treatment. Her willingness to answer all my questions (got tons of them!) eased my worries.
This is how our session went:
- We spoke about the changes I wanted.
- She outlined the shape of my brows using a microblading ruler. She used a pencil to mark the lines.
- After marking the lines, she filled in my brows and groomed and waxed them. She said it was an essential step before starting the microblading process.
- After grooming, she applied a topical anesthetic to numb my brow area. The numbing took 40 minutes. While waiting, we discussed color swatches and what would look best on me.
- She began with the needling process. She dipped the pen with needles on the pigment she mixed and started pressing on my brows. Each press created an ultra-fine stroke, and I could see the pigment seeping in my skin and staying there.
- The entire process took around an hour. She then applied a final layer of the pigment all over my brows. After five minutes, she cleaned it and we’re done for the day!
- She told me we would do a top-up session after four to six weeks to work on areas that need more filling in. My skin needs to heal first.
I couldn’t believe it when I looked into the mirror. My brows looked perfect, just the way I wanted it. I was ecstatic! I can finally leave home without touching an eyebrow pencil or pomade!
Microblading vs Microshading
There are other options to fill in and get perfect brows aside from microblading. One of these is microshading.
Microshading is best for people who want to have thicker-looking and filled in brows. It gives you a more “done” look. I did consider microshading, too, but I wanted the hair strokes to look natural.
The process for microshading is like microblading. Both treatments use a tool to implant the pigment on the eyebrow skin. The major differences are:
- Microblading uses featherweight strokes, while microshading uses repetitive dots.
- The result of microshading gives a powdered effect. It has the same look as eyebrow powder applied on the brows.
- The result of microblading is natural hair strokes that mimic real hair.
Microshading is also a semi-permanent treatment. It costs around $700 to $1,500. On average, it can last up to a year or a little more, depending on your skin type. There is also a touch-up session a month after the first session.
Do note, though, that you can enjoy combining two eyebrow treatments to get the look you want. For instance, if you have very thin brow hair, you can go for microblading and microshading. It will add hair strokes on sparse areas and also add some shading to make the brows look fuller.
Microblading vs Tattooing
Isn’t microblading tattooing as well? Yes and no. It is indeed a type of eyebrow tattooing because the process implants pigment on the surface of the skin. But the difference lies in how deep the ink goes and how long the effects last.
Eyebrow tattooing has a more permanent effect like a typical tattoo. The eyebrow tattoo artist uses a tattoo machine. It uses tapping motions so the needle can penetrate the skin. The penetration is deeper. With microblading, the ink is implanted on the skin surface only. As a result, eyebrow tattooing can lead to bleeding and may heal longer.
There are three types of tattooed eyebrows:
- Crisp brow – Results in a brow with harsh lines
- Powdered brow – Brows are filled in the middle
- Hair-like brow – Like microblading but not as precise; takes longer
I’m not particularly fond of eyebrow tattooing. But I’m sure some people with sparse middle brows will like it. It’s also something to consider for those who want a lifetime effect without the touch-ups.
Microblading vs Microfeathering
Microfeathering is like microblading’s little sister. It is a patented technique by celebrity brow expert Kristie Streicher. She also created The Feathered Brow technique. Microfeathering differs from microblading because it doesn’t work on the entire brow. It only focuses on the areas with sparse growth that needs filling in.
Streicher believes that the microfeathering technique gives the most natural-looking brows. Her goal is to create hair-like strokes that look as realistic as possible. This includes making sure the skin between the hair is seen.
So how does Streicher prepare for a microfeathering treatment? It’s a more intricate process. She prefers working with a client’s natural brow shape. She allots around six to 12 months for eyebrow growth, which she calls growth training. During this time, she tweezes the brows every six to eight weeks only.
After growing the hair, Streicher schedules the treatment session with a client. The process is:
In the first session, Streicher tests the skin first to make sure the client isn’t allergic to the pigments. She uses iron oxide pigments that are safe on the skin. The body absorbs these pigments over time.
She begins working on the denser areas of the brow to test the pigment, design, structure, and hair strokes. That’s the end of the first session.
The next session is scheduled after six to eight weeks from the first session. This is to allow for proper healing of the skin. Streicher then fills in the brows with extra strokes. For some, the entire process may take three sessions.
Microfeathering can last between eight to 12 months. After a year is usually the best time to have a touch-up session. The pigment does not entirely disappear. But, the residual pigment will look very light and unnatural.
The two sessions will cost around $2,500, while the touch-up sessions (eight to 12 months later) are $1,200 each.
For those considering microfeathering, here are some extra notes and tips from Streicher:
- To make microfeathering last longer, avoid exposing the brows to direct sunlight. Use a hat or SPF+30, at least. Ink can fade when exposed to the sun, which will create a blurred effect. Another thing that can fade pigment color is alpha-hydroxy acids. Avoid using products that contain this ingredient.
- People with small pores and dry skin will benefit the most from microfeathering. This skin type doesn’t bleed easily.
- Those with normal to oily skin and medium pores are also great candidates. People who have normal to combination skin but with small pores are, too.
- For those with oily skin, microfeathering may not be a good treatment. The sebum production will cause the skin to heal with a thicker look. The hair strokes will look unnatural. Plus, the oil can reject the pigment, causing it to look diffused and fuzzy.
- If you have hypersensitive skin, that means you also have translucent pores. Your skin bleeds easily, too. This results in a longer healing process, and the pigments will look patchy and ashy.
How Much Does Microblading Cost?
My microblading treatment costs $1,000, but usually, treatment cost ranges from $500 to $2,000. This will depend on the eyebrow artist as well as the quality of the service you’re getting.
How Long Does Microblading Last?
The results can last 12 to 18 months, depending on the skin type. For people with oily skin, they will need to top up when they reach the 12-month mark. I have normal skin, so she said it would last me 18 months before I need to top-up.
How to Prepare for Microblading?
Preparing for microblading is essential in getting the best results after your treatment. Here are a few prep tips to follow:
- Avoid tweezing and waxing the hair a week before microblading.
- Avoid getting a tan on the face two weeks before the treatment.
- Do not get a facial done two weeks before microblading.
- Steer clear of Botox three weeks before your microblading session.
- Avoid taking blood thinners a week before your session. This includes vitamin E, fish oil, ibuprofen, and aspirin.
- Do not work out the day before your session, and avoid drinking alcohol 1-2 days before, too.
- Right before the procedure, don’t drink coffee.
Conclusion
I’m in love with the results of my microblading treatment. I wake up with perfect brows every single day. Some days, I just dab on a lip and cheek tint, and I look fresh and ready to go! Nonetheless, there are other options for you to try out there, depending on your needs. What’s important here is to find a reputable and professional eyebrow artist. Go for one with a solid track record of providing quality services to make sure your eyebrows are in good hands!
Frequently Asked Questions
What Makes a Good Curling Iron for Thick Hair?
Curling irons for thick hair must have a high-temperature setting (heat up to at least 400F) to hold thick hair into curls all-day if not for a few days!
The best curling irons for thick hair use an advanced ionic or infrared technology to reduce frizz and keep your hair moisturized.
What size barrel is best for thick hair?
For thick hair, a curling iron with a barrel sized 1.5 inches is the most suitable option for everyday use.
Depending on your desired hairstyle, you can section your hair into smaller or thicker sections to create both tight and loose curls.
How do you make curls last all day with thick hair?
Use a mousse and heat protectant before you blow-dry in order to give the hair more hold. Prepping with a setting spray is also great for locking in your curls. Many of them offer heat protection, too!
Does Microblading Hurt?
The blade and the needles are what make people anxious about the process. But since a topical numbing ointment is applied, you will not feel any pain during the procedure. You will only feel a sensation when the needles are pressed on the skin. After going under the needles, I’d say threading is more painful than microblading.
Is Microblading Safe?
According to the Society of Permanent Cosmetic Professionals, microblading is a safe procedure. As long as the tools undergo the proper sterilization process, there shouldn’t be a problem.
Nonetheless, since the needles do pierce the skin, there’s a risk of infection. It is crucial to follow the proper aftercare steps. Also, make sure that the eyebrow artist is from a credible and reputable institution.
How to Care for Your Eyebrows After Treatment?
- During the first week post-microblading, wash the brows with antibacterial soap in the morning and at night. To dry, pat gently with a tissue. Make sure to avoid using cleansers with acids and exfoliants since this will cause the pigment to fade faster.
- You may apply coconut or rosehip oil on the brows twice a day for faster healing. But first, check if you’re allergic to these oils.
- Sleep on a clean pillowcase to avoid infection.
- Avoid facials, peels, and Botox for four weeks after the session.
- You may also need to avoid sweating profusely and direct sun exposure a week after the procedure.
- Avoid swimming and steamy showers for 10 days after microblading.
- Avoid touching and picking on your eyebrows during the healing process.
What is a Top-Up Session?
A top-up session is the same as a touch-up session. This is where you go back to the technician to refill the pigments on your brows. It is usually done after eight to 12 months from your microblading session. Touch-ups will also depend on how blurred or faded the pigment has become.
Can Microbladed Eyebrows Be Removed?
Yes, they can. One way to remove microbladed eyebrows is with a laser treatment. The removal can span up to eight to 12 sessions and can set you back around $150 per session. There is a risk with laser treatment, though, it can also remove the hair. Another way is to apply a removal solution, which will also take several sessions.
For social: Not only does microblading create perfect, natural brows, but the effects also last you an entire year. Achieve your #wokeuplikethis look with microblading!